In a previous post I wrote about how to add a custom WooCommerce product type, I also scratched the surface there about how to add custom fields to the new product type. Here I want to go a bit more in depth on how to add a new product fields to your WooCommerce products (which can be your own custom, or existing simple/variable etc products).
Adding a custom settings panel
A custom settings panel within your product can be used to segment your own settings in a separate section. This will work great if there is no good position available within the existing panels in the WooCommerce product settings.
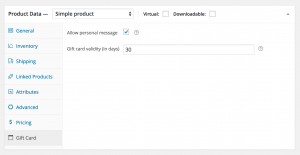
The example below will add a ‘Gift card’ settings panel;
With the above in place, you should have a result similar to this.
Repositioning the custom settings panel
At the moment of writing it is not possible to prioritise/reposition a settings panel in a pretty way. There still is a way as shown below, but in my opinion this is a lesser way of doing it. Be sure to replace the custom_product_tabs function that was created in the previous code snippet with the one below.
This will add the new product panel after the second (‘Inventory’) tab, you can change the position by changing the insert_at_position in the function. This code will simply insert the $new_tab in between existing tabs. This isn’t a ideal way of repositioning a settings tab, but it seems to be best way without breaking anything.
I’ve send a Pull Request to WooCommerce that will allow you to add a priority => 15 parameter to the array, allowing you to have a nice and pretty way or ordering the product data panels. See the current status here; https://github.com/woocommerce/woocommerce/pull/13260
Update: the pull request has been accepted and you can now sort the tabs more easily using the ‘priority’ parameter.
Setting the custom settings panel icon
The icon you’ve seen in the screenshot earlier above isn’t exactly useful, pretty or anything near what you may want/need. There are two ways of changing the icon, both are using CSS to modify the specific tab, but one uses the available WooCommerce Icons, and the other one includes adding a fully custom icon of your own.
Using a WooCommerce Icon
![]() There are a bunch of WooCommerce Icons available, but they are limited. You can find all of them in the following GitHub repository; WooCommerce Icons. In order to view and choose a icon, you need to ‘Download ZIP’, unpack and open the ‘demo.html’ in your browser.
There are a bunch of WooCommerce Icons available, but they are limited. You can find all of them in the following GitHub repository; WooCommerce Icons. In order to view and choose a icon, you need to ‘Download ZIP’, unpack and open the ‘demo.html’ in your browser.
In that file you search your fitted icon, and copy the code below the icon. You can then insert a bit of custom CSS in your plugin (recommended to add a stylesheet).
The li.giftcard_options identifies the correct product tab and it will add the correct icon.
Using a fully custom icon
If you can’t find an icon in the existing ones that WooCommerce offers, you can also add your own. Below I will show an example how it can be done using a SVG icon. Another way would be by using a other custom font family (for example Font Awesome).
Adding a custom-custom product field
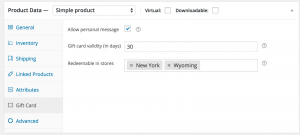
WooCommerce has a bunch functions available for default fields (overview of all of them), but they may not fit your needs. One example of a custom field I like to use is a very neat drop down upgrade like Select2 which should be included in WP Core sometime soon (originally planned for 4.2, didn’t make it), it however is included in WooCommerce.
In the code snippet below I’m adding my custom formatted HTML to display the setting to fit my needs. The code should be added to the giftcard_options_product_tab_content() function.
(WooCommerce is loading select2 by default, but it is a good idea to add that as a dependency to your plugin)
And of course, don’t forget to save the values in the save_giftcard_option_fields function;
Adding product options (like ‘Downloadable’ and ‘Virtual’)
For this example, it would make sense that one would like to distinguish regular simple products, from the actual gift card products. As we’re not using a custom product type for this a good alternative would be to add a new checkbox in the meta box header. It will be positioned right beside the ‘Virtual’ and ‘Downloadable’ options.
The following code adds the new option.
And in order to save the checkbox;
EXTRA: Only display the Gift Card tab when checked
Now that we’ve added the gift card check, we can also only display the ‘Gift Card’ product data panel when the ‘Gift Card’ product option is checked. Lets first change the custom_product_tabs() function. Change the array( 'show_if_simple', 'show_if_variable' ), to array( 'show_if_gift_card' ),
As WooCommerce doesn’t know about our new setting, the right functions to make our new show_if_gift_card class work as we need aren’t there. To get this working we need to add a bit of JavaScript.
You can add the code snippet above to the wcpp_custom_styles() function (Whoops! now its actually named wrong!)
Thats it!
You’ve now added a ton of cool things on the backend of your product page. In a future post I will dig into how you can display these same custom field on the front end of your website and display them in the cart.
Here you can find all the code used in this post in one file; https://gist.github.com/JeroenSormani/6b710d079386d096f932
I would love to hear from you if this was useful in any way, have feedback, missing something that you’d love to see or just a Thank you 😉


18 thoughts on “Adding custom WooCommerce product fields”
Thank you very much for this awesome post! It helped me a lot. Best wishes
How would this work with the add-to-cart link? Example, I use site.com/?add-to-cart=517&quantity=10 to add a product. If it has a custom field, how would I add that to this url for adding a product without going to the product page?
Great article, thank you very much for your help!! 🙂
Hi Jeroen, hier iemand die prima jouw naam uit kan spreken en ook een gezonde Pizza kan waarderen 😉 Om in de stijl van je Blog the blijven, de rest in het Engels. Ps. als je me wilt bellen, mijn nummer staat op verdi.nu.
—
Bit of a challenge here. Can you advise me on how to:
1. Must-Have: Add field(s) in the backend where you can enter several Start Dates (for classroom training/exam/workshop).
– Must-Have: Display products in table view, sortable by first available date. If possible by using a shortcode.
– Nice-to-Have: Displayed in own tab called “Lagant options”)
– Nice-To-Have: Passed dates will be removed automatically.
– Nice-To-Have: Users can sort by both categories and tags, so they can quickly find what they are looking for.
Case:
User gets to see table of upcoming classroom training courses. Sorted on the first upcoming training. They can purchase now, knowing their training will start at a specific date.
Users must be able to see the following in table view:
– Start date of product
– Product name
– Price
– “More info”
– “Add to Cart”
Can’t seem to find the right plugin or script to do this in a way that is also usable for a content manager (read: easy to use, after set up is done 🙂 )
Found several scrips to make it happen, but do not have enough knowledge to put them together.
Just a thought: Maybe you are willing to create a plugin like this for all training agencies (there are a lot of them!) and we will be your first customer.
Hi Verdi,
It would be way to much to advise you on how to accomplish something like this in a comment. Especially if you’re not comfortable enough with coding yourself.
Given your requirements the best thing I can advise is to hire a developer to help you out with this. If wanted I’d be happy to discuss this as a project with you, feel free to reach out through here if interested; https://jeroensormani.com/hire-me
Cheers,
Jeroen
Thanks a lot, but woocommerce_product_data_tabs is deprecated. Could you plese update the tutorial?
I used the array_slice function and when it wouldn’t work properly I looked at the output array and discovered a “priority” parameter similar to the one used for sorting the WP admin menu: “priority => 5” will sort the new tab above the general product data tab, “priority => 15” will sort it below.
Thanks for the post, very helpful!
Thank you so much.
Great article! Bookmarked for future reference when I want to add to the tabs and fields.
But, how do I take away?
I have a premium plugin Product Vendors that adds Commission field to the Product Data – General tab.
I want to remove this so that this value can only be controlled at the global level. Suggestion or another article perhaps that teaches how to do that?
Hi Blue,
Best thing to disable that is to remove the action from the Vendors plugin that adds it using the `remove_action()` function.
I’ll keep it in mind for a possible future post 😉
Cheers,
Jeroen
Greate Work! Thank You Somuch
Thank you so much for this great turorial,
but can you explain how is possible to echo this field in the product single page?
Best Regards,
Alessandro.
awesome, thks a lot!
Thanks so much Jeroen, this is so helpful!
I’m having a problem with a custom-custom multi-selection product field I’ve added:
It has the same structure as the ‘redeemable_stores’ case. The new field is properly displayed at the front-end, and I’m able to select among options.
However, added values disappear after save product page changes. There is apparently an issue when saving values with:
update_post_meta( $post_id, ‘_redeem_in_stores’, (array) $_POST[‘_redeem_in_stores’] );
but I’m unable to find where is the problem. Could you please help me?
Hi Manuel,
From the sounds of it the field may not get populated properly with the value causing it to save a empty value once you hit the save button..
Another possibility is that one of the field names is incorrect, causing a empty save value as well.
Great article, thank you very much for your help!!
How did you know this function “woocommerce_product_data_panels” exists? Searching the woocommerce action and filter hooks documentation returns no results for me.
Hi Dominick,
I tend to look through the source code itself for the needed hooks, not the documentation. Always up to date and I know exactly what it does 😉
Cheers,
Jeroen